1. To place an order you first need to log in or register. You cand do that by accessing Account section from the menu bar to Log In / Register or click on Start now/Get started buttons you can find all across the website.

2. Top up your account by clicking Add Funds and then completing the checkout form

3. Select your method of payment: Credit card or Cryptocurrencies. Bear in mind that if you choose to use Cryptocurrencies you need to contact us on the live chat in order to provide you our BTC, ETH, LTC, XLM, XRP, BAT, MKR, DAI, PAX, USD-T or USD-C
Now you can select the type of proxy you wish to order:
- US Mobile Proxy
- Residential Proxy
- Static Mobile Proxy
- International Mobile Proxy
- ISP Proxy
Placing an order for a USA mobile proxy
a. All mobile proxies are US based and we have the option of selecting a specific state or leave it random. You can check the network status before placing an order.

b. After checking the network status click on Buy Proxy Gateways
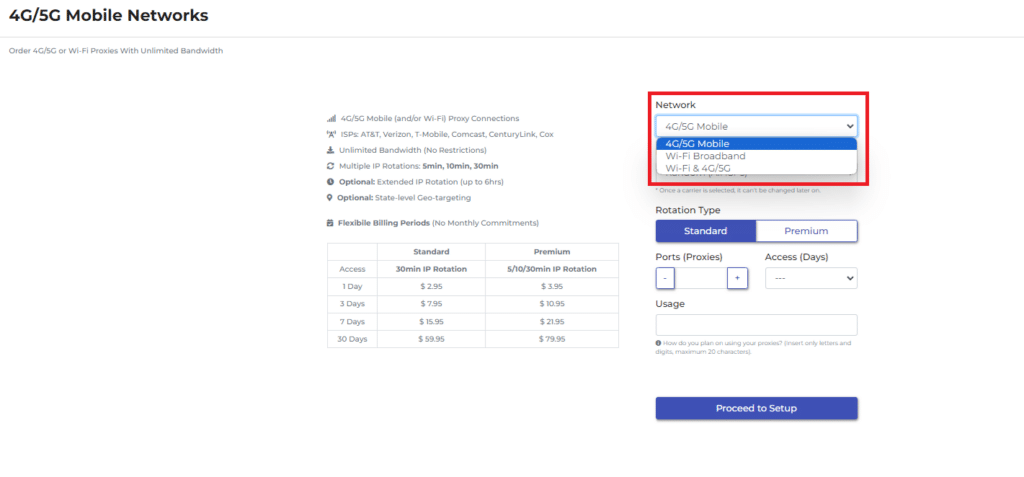
c. First step is to choose what type of mobile proxy you need:
- 4G/5G proxy.
- WI-FI Broadband proxy.
- a mix of both above WI-FI and 4G/5G proxy.
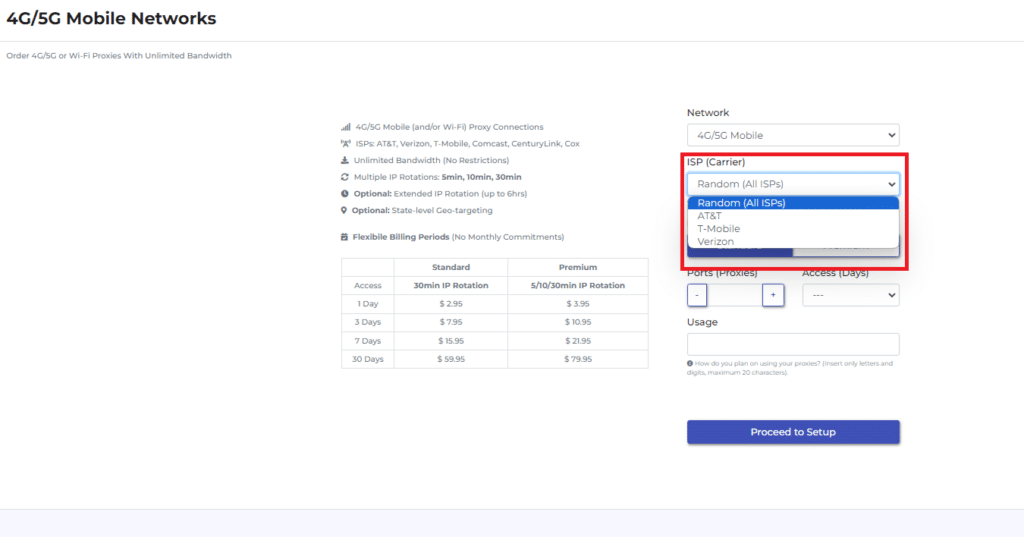
d. Second step is to select an ISP out of AT&T, T-Mobile or Verizon. You can also leave Random if you do not need a specific ISP.
e. Next step is to select a rotation type. Our *mobile network* has four rotation setups:
1) *5 min auto IP rotation* (only for Premium orders) – your proxy will rotate into a new IP at every 5 minutes.
2) *10 min auto IP rotation* ( only for Premium orders) – your proxy will rotate into a new IP at every 10 minutes.
3) *30min auto IP rotation* (for both Premium and Standard orders) – your proxy will rotate into a new IP at every 30 minutes.
4) *Extended rotation* (for both Premium and Standard orders) – you’ll be allocated IPs with extended rotation periods that can last for *up to 6 hours*.
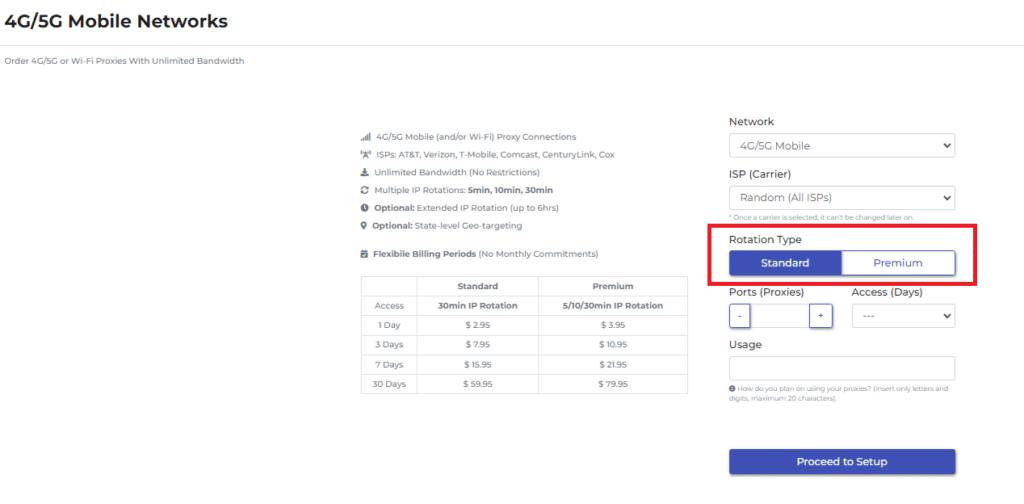
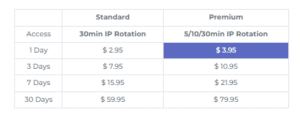
Please note that for 5 or 10 minutes rotation you will need to select the Premium option wich will lead in a price increase. You can check the difference in pricing between Standard and Premium in the table displayed on the same page:
If you select Premium you can switch between all 4 rotation types anytime after you placed your order. If you select Standard only 30 minutes or extended rotation will be available
f. Then you need to enter the number of ports you want to purchase (in most cases you need to select 1).
A proxy port is a connection gateway to our network.
The number of ports you choose gives you the number of access points you can use on our network at any given time.
For example: if you get 1 port, you will have one access point to our network to use one rotating IP address. IP that rotates at minimum 30 min. But with 3 ports, you get 3 access points at the same time. This means that you can use 3 rotating proxies at once.
In other words, the number of ports is the number of proxy connections you want to get.
If you need more details regarding the proxy ports click here
g. Then you need to select the plan period: 1, 3, 7 or 30 days
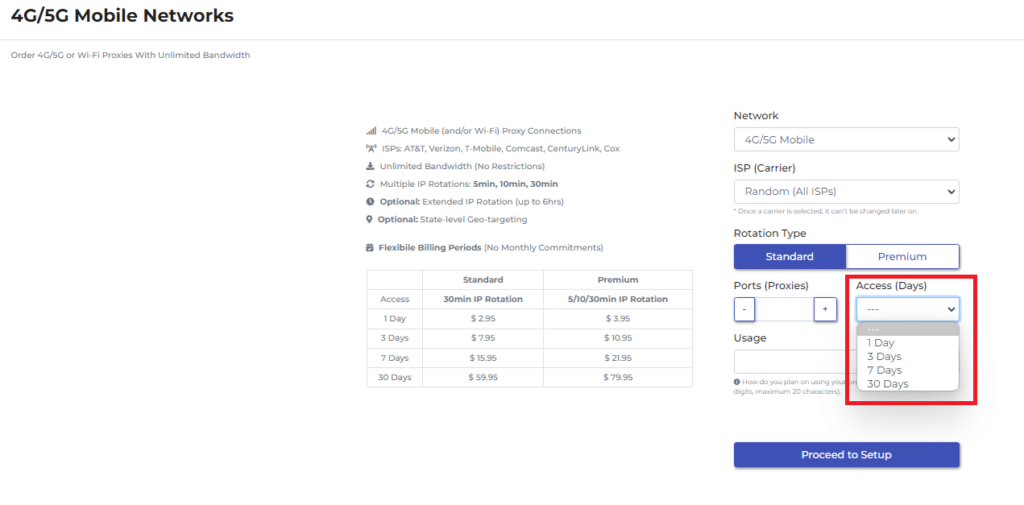
h. The usage field and text should be filled with a couple of words on how you plan on using your proxy order (eg: scraping, social media, smm, account login, research, etc).
It is a text of two-to-three words that will help you identify your proxy order (you can consider it your order’s name).
i. Click on “Proceed to setup” to get to the final order page. Here you need to insert the following:
- Initial proxy location: after purchasing you can change this every 30 minutes
- Protocol: mobile proxies have both protocols available (HTTP/S and SOCKS5)
- IP rotation time: for Premium order you can select and swich between all 4 rotation types while for Standard only 2 options available (30 minutes/extended rotation)
- Whitelist IP: the whitelist access IP is your local one, you need the public one which you can find it on https://ipapi.com/. You can change the IP in 30mins from your dashboard after you order.
j. In order to change the proxy settings (US state and whitelisted IP you need to click on “Manage access” button next to your order

Here you can change the whitelisted IP, location (US states) and rotation type (30 min or extended – up to 6 hours). Make sure you click submit button after making any changes.

k. After that you can make those changes (bear in mind you have this option only once every 30 minutes)
