Proxy Setup for Penetration Testing: 2026 Guide

Proxy setup for penetration testing is the process of configuring tools like Burp Suite, OWASP ZAP, and Proxychains to intercept, route, and manipulate network traffic for vulnerability analysis. These tools give you man-in-the-middle capabilities that are essential for identifying logic flaws and security weaknesses in web applications and networked systems. Getting the configuration right, including CA certificate installation, listener setup, and DNS leak prevention, separates a functional testing environment from one that breaks on the first HTTPS request. This guide covers every layer of proxy configuration, from local intercepting proxies to system-level chaining, with troubleshooting built in.
What tools do you need for proxy setup in penetration testing?
The three primary tools for proxy setup in penetration testing are Burp Suite, OWASP ZAP, and Proxychains. Each operates at a different layer and serves a distinct purpose in your testing workflow.
Burp Suite is the industry standard for web application security testing. Its proxy module intercepts HTTP and HTTPS traffic between your browser and the target, letting you inspect and modify requests in real time. The Community Edition covers most basic interception needs, while Burp Suite Professional adds active scanning and advanced automation.

OWASP ZAP (Zed Attack Proxy) is the open-source alternative maintained by OWASP. It provides comparable interception and scanning features and is widely used in CI/CD pipelines for automated security testing. Both Burp Suite and OWASP ZAP listen on 127.0.0.1:8080 by default and require CA certificate installation to handle HTTPS traffic without errors.
Proxychains operates at the system level, routing TCP connections from command-line tools through one or more proxy servers via dynamic library injection. This makes it the right choice when you need to push tools like nmap or curl through a proxy chain rather than just browser traffic.
| Tool | Layer | Primary use case |
|---|---|---|
| Burp Suite | Application (HTTP/HTTPS) | Web app request interception and modification |
| OWASP ZAP | Application (HTTP/HTTPS) | Open-source scanning and CI/CD integration |
| Proxychains | System (TCP) | Routing CLI tools through proxy chains |
| FoxyProxy | Browser extension | Quick proxy profile switching in Firefox/Chrome |
Before starting any configuration, confirm you have the following in place: administrative access to install CA certificates, a target environment you are authorized to test, and a browser configured to route traffic through your proxy listener. For Linux-based setups, review this Ubuntu proxy setup guide to verify your system-level configuration before layering application proxies on top.
How to configure Burp Suite and OWASP ZAP for penetration testing
Configuring an intercepting proxy correctly requires four steps: installing the tool, setting the listener, configuring your browser, and installing the CA certificate. Skipping any one of these steps breaks HTTPS interception.
Step 1: Install and launch your intercepting proxy. Download Burp Suite from PortSwigger or OWASP ZAP from the OWASP project page. Both run on Java and are available for Linux, macOS, and Windows. Launch the tool and confirm the proxy listener is active.
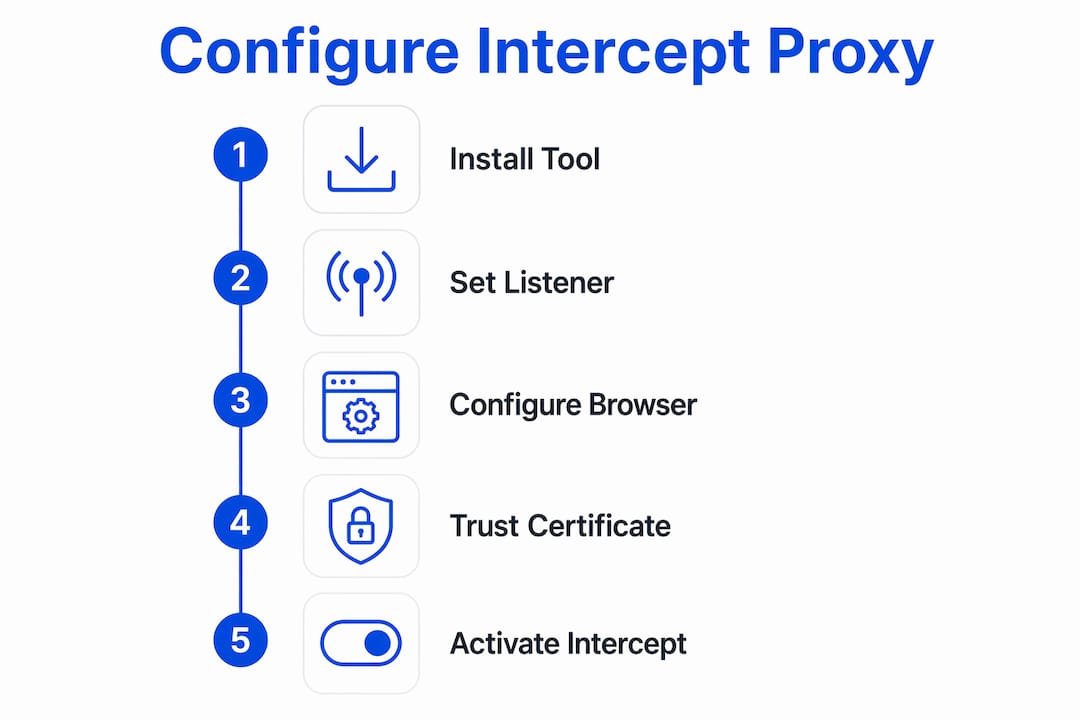
Step 2: Verify the proxy listener address and port. In Burp Suite, go to Proxy > Options and confirm the listener is set to "127.0.0.1:8080`. In OWASP ZAP, check Tools > Options > Local Proxies. If port 8080 is already in use on your system, change it to 8081 or another available port and note the change for your browser configuration.
Step 3: Configure your browser to route traffic through the proxy. You can do this manually in your browser’s network settings, or use FoxyProxy to manage multiple proxy profiles. FoxyProxy lets you toggle proxy profiles instantly without re-entering settings each time, which is a significant workflow advantage during active testing sessions.
Step 4: Install and trust the proxy CA certificate. This is the step most beginners skip, and it causes every HTTPS site to throw a certificate error. Without the CA certificate, browsers block intercepted HTTPS traffic entirely. In Burp Suite, navigate to http://burpsuite while the proxy is active to download the certificate, then import it into your browser’s trusted certificate store. OWASP ZAP generates its own CA cert under Tools > Options > Dynamic SSL Certificates.
Step 5: Activate intercept mode and verify. In Burp Suite, toggle Intercept is on under the Proxy tab. Visit any HTTPS site in your configured browser. The request should appear in Burp’s intercept window, confirming that HTTPS traffic is decrypted and available for inspection and modification.
Pro Tip: Create a dedicated browser profile exclusively for penetration testing. This keeps your CA certificates, proxy settings, and extensions isolated from your personal browsing and prevents accidental traffic leakage between sessions.
How to use Proxychains for system-level proxy chaining
Proxychains routes TCP connections from any command-line application through a defined proxy chain using dynamic library injection. This means tools like nmap, curl, sqlmap, and ssh can all be forced through your proxy without any native proxy support built into those tools.
Step 1: Install Proxychains. On Kali Linux or Debian-based systems, run sudo apt install proxychains4. Confirm installation with proxychains4 --version. If you see a DLL init error instead, the proxychains-ng package is missing or the binary path is incorrect.
Step 2: Edit the configuration file. Open /etc/proxychains4.conf in a text editor with root privileges. This file controls chain behavior and proxy list entries.
Step 3: Select a chain mode. The three primary modes are:
dynamic_chain: skips dead proxies and continues with the next available one. Best for reliability.strict_chain: requires every proxy in the list to be reachable. Fails if any proxy is down.random_chain: selects proxies in random order. Useful for obscuring traffic patterns.
Step 4: Enable proxy_dns. Uncomment the proxy_dns line in the config file. Enabling proxy_dns routes all DNS queries through the proxy chain, preventing DNS leaks that would expose your real IP address to the target or any monitoring system.
Step 5: Add your proxy entries. At the bottom of the config file, add proxy entries in the format socks5 127.0.0.1 9050 for a local SOCKS5 proxy, or substitute your external proxy address and port. You can chain multiple proxies by adding multiple lines.
| Common error | Cause | Fix |
|---|---|---|
| DLL init error | proxychains-ng not installed | Run sudo apt install proxychains4 |
| DNS leak detected | proxy_dns not enabled | Uncomment proxy_dns in config |
| Connection timeout | Proxy is slow or unreachable | Switch to dynamic_chain mode |
| Permission denied | Config file not writable | Edit with sudo |
Pro Tip: Run proxychains4 curl https://api.ipify.org after configuration. If the returned IP matches your proxy server rather than your real IP, your chain is working correctly and DNS is not leaking.
How to manage browser proxy settings for testing workflows
FoxyProxy is the most efficient tool for managing browser proxy settings during penetration testing. It is available as a browser extension for both Firefox and Chrome, and it lets you create multiple proxy profiles and switch between them with a single click.
The core advantage over manual browser settings is speed. During a typical test, you may need to route traffic through Burp Suite for web application testing, then switch to a direct connection to verify behavior without interception, then switch again to route through an external proxy for geo-specific testing. Doing this manually through browser network settings takes 30 to 60 seconds each time. FoxyProxy reduces that to under two seconds.
To configure FoxyProxy for a Burp Suite session:
- Install FoxyProxy Standard from the Firefox Add-ons or Chrome Web Store
- Open FoxyProxy options and create a new proxy entry with address
127.0.0.1and port8080 - Label the profile clearly, for example “Burp Suite Local”
- Create a second profile for OWASP ZAP on port
8081if you use both tools - Set FoxyProxy to “Use Proxy by Patterns and Order” to route only specific domains through the proxy, or “Use Proxy for All URLs” for full interception
The manual fallback method, setting proxy details directly in your browser’s network preferences, remains useful when extensions are unavailable or when testing in a minimal environment. For ISP proxy configurations in infrastructure testing scenarios, manual settings give you more direct control over authentication parameters.
Common mistakes and troubleshooting tips in proxy setup
The most frequent failure point in proxy configuration for testing is missing CA certificate installation. Browsers block HTTPS traffic intercepted by Burp Suite or OWASP ZAP when the proxy’s CA certificate is not trusted, producing certificate errors that halt testing entirely. Install and trust the certificate before attempting any HTTPS interception.
Other common errors include:
- Port conflicts: If another service occupies port 8080, your proxy listener will fail silently. Check with
netstat -tlnp | grep 8080and reassign the listener port if needed. - DNS leaks in Proxychains: Forgetting to enable
proxy_dnsmeans DNS queries bypass the proxy chain entirely, leaking your real IP. This is a critical operational security failure during authorized tests. - Incorrect chain mode: Using
strict_chainwith unreliable proxies causes complete connection failures. Switch todynamic_chainfor more resilient routing. - Browser not pointing to the proxy: Confirm your browser’s proxy settings match the listener address and port exactly. A single digit error routes traffic directly, bypassing interception.
Pro Tip: After completing any proxy configuration change, verify interception is working before starting a test. Visit http://burpsuite in Burp Suite or check ZAP’s history tab. Confirming traffic appears in the tool takes 10 seconds and prevents wasted testing time on a misconfigured setup.
Proxy configuration accuracy is not optional in penetration testing. A misconfigured proxy does not just reduce visibility. It can silently route traffic outside your controlled environment, invalidating your test results and creating unintended exposure.
Key takeaways
Effective proxy setup for penetration testing requires correctly configured intercepting proxies, trusted CA certificates, and system-level proxy chaining with DNS leak prevention enabled.
| Point | Details |
|---|---|
| CA certificate installation | Install and trust the proxy CA cert in your browser before any HTTPS interception attempt. |
| Default listener ports | Burp Suite and OWASP ZAP both default to 127.0.0.1:8080; verify no port conflicts exist. |
| Enable proxy_dns in Proxychains | Uncomment proxy_dns in /etc/proxychains4.conf to prevent DNS leaks during CLI tool routing. |
| Use FoxyProxy for efficiency | FoxyProxy profiles reduce proxy switching time from minutes to seconds during active tests. |
| Verify before testing | Confirm traffic appears in your proxy tool before starting any test session. |
Why proxy configuration accuracy matters more than tool choice
After working with proxy setups across dozens of penetration testing engagements, the pattern I see most often is testers spending time selecting the right tool and almost no time verifying the configuration is actually working. Burp Suite and OWASP ZAP are both excellent. The choice between them rarely determines test quality. The configuration does.
The combination of an intercepting proxy with Proxychains is underused. Most testers treat them as separate workflows, but layering both tools gives you application-layer visibility through Burp Suite and system-level routing through Proxychains simultaneously. This is particularly useful when testing APIs that do not respect browser proxy settings.
The other thing I would push back on is the assumption that proxy setup is a one-time task. Proxy tools update frequently, CA certificate handling changes across browser versions, and new chain modes appear in Proxychains releases. Treating your proxy configuration as a living part of your testing environment, rather than a setup-and-forget step, keeps your workflow reliable as the tooling evolves.
— Eduard
Strengthen your proxy setup with reliable IP infrastructure
Intercepting proxies and Proxychains handle traffic routing and inspection, but the quality of the upstream proxies you route through directly affects test reliability and anonymity. Hydraproxy provides residential, mobile, and ISP proxy networks built for high anonymity and granular session control. For penetration testing workflows that require real-user-like traffic patterns or geo-targeted testing, Hydraproxy’s residential proxy infrastructure gives you access to a broad pool of household IPs without DNS leaks or identification risks. Rotating and sticky session options let you control IP persistence based on your specific test requirements. Explore Hydraproxy’s proxy options to add reliable upstream infrastructure to your existing setup.
FAQ
What is the default port for Burp Suite and OWASP ZAP?
Both Burp Suite and OWASP ZAP listen on 127.0.0.1:8080 by default. You can change this in each tool’s proxy settings if port 8080 is already in use on your system.
Why do HTTPS sites show certificate errors during proxy interception?
Certificate errors occur when the proxy’s CA certificate is not installed and trusted in your browser. Install the CA cert from Burp Suite or OWASP ZAP into your browser’s trusted certificate store to resolve this.
How does Proxychains prevent DNS leaks?
Proxychains routes DNS queries through the proxy chain when the proxy_dns option is enabled in /etc/proxychains4.conf. Without this setting, DNS requests bypass the proxy and expose your real IP address.
What is the best chain mode for Proxychains in penetration testing?
dynamic_chain is the most reliable mode for penetration testing. It skips unresponsive proxies and continues with the next available one, preventing connection failures when individual proxies are slow or unreachable.
Can FoxyProxy work with both Burp Suite and OWASP ZAP at the same time?
FoxyProxy supports multiple proxy profiles, so you can configure separate entries for Burp Suite on port 8080 and OWASP ZAP on port 8081 and switch between them instantly without changing browser settings manually.